Archives For software

Office 365 ProPlus will be offered to students at no additional charge. Students can now take advantage of all that Office 365 ProPlus has to offer.

Office 365 ProPlus for PC Installation

You can download the latest version of Office with Office 365. To install the latest version of Office:

Read More

image001

Office 2016 for Mac is now available

Office 365 subscribers get early access to Office 2016 for Mac

Download now: https://portal.office.com/OLS/MySoftware.aspx

What’s New 

Unmistakably Office
Microsoft Office 2016 for Mac features a redesigned Ribbon menu similar to the Windows and iPad® versions. You can navigate your Word, Excel and PowerPoint files with familiar Mac OS Multi-Touch gestures. And it’s all sharper and clearer than ever on your Retina display.

Your best work anywhere, any time 

Access your documents whenever you need them, with OneDrive for Business, SharePoint and Dropbox for Business integration. Use state‑of‑the‑art tools to create great‑looking documents, analyse data and present with confidence.

Made for teamwork

No more sending attachments back and forth via email. Easily share your files with others, then edit them simultaneously in Word, PowerPoint or OneNote. Plus, Office preserves your content and formatting across all devices for seamless collaboration.

Download Office 2016 for Mac: https://portal.office.com/OLS/MySoftware.asp Read More

Office 365 is now available across devices – access Office 365 applications on your PC, laptop, tablet or smartphone, work from virtually anywhere with 1TB of online storage (Tablet/Smartphone: Make sure you have downloaded the Microsoft app for your device.)

Read More

Web Print is a new feature which allows users of PaperCut to print a file from their laptop, Smartphone, or tablet device without the need for driver installation or setup.
To access Web Printing you can navigate to http://backup:9191/user in your browser or click on Details… on the Papercut Client window illustrated below:

You will then be presented with a login screen. You should use your standard network details to complete this form.

Then click on Web Print on the left hand side of the window.

You should then click on Submit a Job. At which point you will be presented with the following screen:

Select which printer is closest to you and thus which you would like the print job to be delivered to by clicking on the check box to the left of the correct name. Then click on the Print Options and Account Selection button to proceed to the next stage.

Then select the number of copies you require, being careful to avoid any unnecessary amount of prints.

Then proceed to click 3. Upload document:

You will then be able to Browse and choose a file to upload by browsing to it, whether it is on your USB memory device or network user area.

The list of file formats below detail exactly what types you are able to upload. You can upload any Microsoft Word Document, PowerPoint File, Excel Spreadsheet, XPS and PDF documents.

Finally click Upload & Complete you will then be able to watch as your file is uploaded and sent to the printer you have chosen.

If you have chosen a printer in a classroom your print will come straight out and be sitting in the output tray, please be aware of this and collect your document immediately.

Read More

The latest version of Read & Write Gold 11 is now available to all students and staff and a copy can be obtained from the library.

This version is compatible with Windows 8, 7, Vista and XP.  The software is very useful for those students struggling with their reading and writing.  Apart from the new look and feel the application includes some new items; Nuance Vocalizer text-to-speech voices, support for Chrome and Firefox, support for Google Docs, and two new features – Word Cloud and Voice Note.

There are enhancements to many of the features including the phonetic spell checker, word prediction, dictionary and much more. Read More

CamStudio is able to record all screen and audio activity on your computer.  You can use it to create ‘How to…’ videos for any software program or create a set of videos answering your most frequently asked questions?  It is also a useful tool for creating video tutorials and resources for classes and could be helpful when preparing cover materials.  Once created these resources can be made available through the college VLE or You Tube or…..

You can download and use it completely free – http://camstudio.org/ – scroll down for the download links.


Make sure you download the Codec as well as CamStudio.

Getting started with CamStudiohttp://www.screencast.be/video/using-camstudio

  Read More

How many times have you viewed documents or photos on your iPad and wished you could print those wirelessly without firing up your laptop or desktop.

There are several ways to print from your iPad. Here are some methods and apps to try, depending on the printer model you own:

1. AirPrint Compatible Printers
The easiest solution is to invest in a wireless printer that supports AirPrint technology. The AirPrint feature built into your iPad lets you wirelessly print to any AirPrint compatible printer. It is hassle-free, considering that you don’t need to download any software or install any printer drivers. Just make sure that your iPad has an updated iOS. Here’s a complete list of AirPrint-enabled printers.

The initial implementation of AirPrint also works with a handful of newer HP printers that support something HP calls ePrint. If you happen to have such a printer (HP has a list of them on its Website), and it’s on the same local network as the iPad, your iPad will be able to see it and print without any special configuration. (ePrint also gives your printer a private e-mail address, so you can also e-mail a document as an attachment, and it’ll print automatically.)

2.  Printer Apps for the iPad
If you do not own an AirPrint-enabled printer, there are alternative printing methods available. Several printer manufacturers have come out with iOS apps to help you print directly from your iPad to their portfolio of wireless printers , regardless of whether your printer is compatible with AirPrint or not. Here are some available apps:

A. HP ePrint Home & Biz App
Download the free HP ePrint Home & Biz app on your iPad to print documents, PDFs, photos, web pages, and email attachments. The app works with over 200 HP printer models.  Using the app, you will be able to connect directly to an HP printer available on a local wireless network and initiate the print job.

Another option is to look into buying one of HP’s printers with ePrint like HP Officejet 6100 e-Printer Wireless Color Printer. With an HP ePrint enabled printer, you can simply email the document or photo you want to print from your iPad to the printer’s email address and the file will automatically print. You could also use your iPad’s AirPrint feature.

HP Printer Control is also available for compatible all-in-one printers. This will also enable scanning and copying functionality from your iPad or iPhone. There is a guide and list of printers it is compatible with on their HP Printer Control page.

HP Printer Control is a free downloadable app available in iTunes App Store.

B. Epson iPrint App
The Epson iPrint app is a free downloadable app that lets you connect directly from your iPad to an Epson printer within your wireless network. Besides, documents, photos, PDFs and more, the app also supports printing files from cloud-based storage services such as DropBox and Evernote.

C. There are several other similar apps created by manufacturers for their printers:

Lexmark LexPrint App

Read More

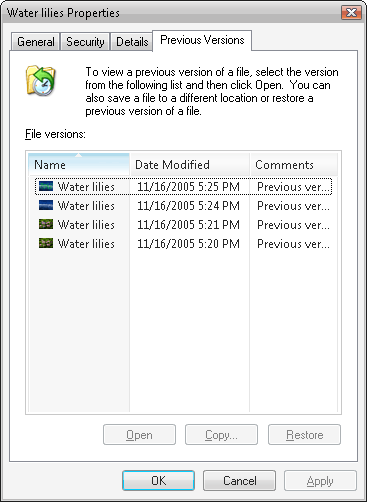
There are a few different options available to you if you are unfortunate enough to loose some of your data depending on what hardware you have and what level access you have on your computer. Windows 7 has the option to restore previous versions (although this may not be enabled by default). Previous versions are either backup copies—copies of files and folders that you back up by using the Back Up Files wizard, or shadow copies—copies of files and folders that Windows automatically saves as part of a restore point (Shadow copies can be copies of files on your computer or shared files on a computer on a network.). You can use previous versions of files to restore files that you accidentally modified or deleted, or that were damaged. Depending on the type of file or folder, you can open, save to a different location, or restore a previous version. To learn more about this, click this link.

If you are a member of staff or a pupil and your work has been within a backup point (shown below) and saved on the network such as the college my documents / public / resources drive (depending on user), your data can be recovered. The following guide will show you how. Our college drives give you the option to restore previous versions twice a day. If you navigate to the folder of where the stored file was and right click on it, you will find a ‘Restore previous versions’ option. In this scenario, Robby has deleted an image from the ‘Scanned Documents’ folder.

You will then be presented with a screen showing all the back-ups of that folder which are available to you, by default these are usually sorted in chronological order. If you require a file which was deleted previous to a date shown on the list, then please contact ICT support. Now select a folder on the list at a time when you knew the file was there.

This will open the folder which was backed up at that point. You can now copy the file/s concerned out of that folder to a new destination or paste back to where they were originally.

Unfortunately, if your work was created and deleted between backups you will not be able to use this feature. The previous versions schedule for Sidmouth College servers is as follows;

Microsoft Office Outlook – Email Recovery

If you are running Microsoft Office Outlook for your email -You may accidentally delete an important email, recovery is easy.Firstly, check it is not in the   folder. If it has been cleared out from this location, navigate to the main top tool ribbon and clicking on ‘Folder’, and then select ‘Recover Deleted Items’. This will then give a list of all emails that have been ’emptied’ out of the deleted items folder. This will not work if you are using the colleges Outlook Web App (https://webmail.sidmouthcollege.devon.sch.uk).


Good working practices to minimise data loss

Nevertheless, it is good practice to save your work as you are working on it and to ensure you save it in more than one location to minimise the risk of loosing it through hardware failure or user error. If you are using a Microsoft package, once your work is initially saved you can quickly save it as you go by holding down the ‘CTRL’ key and pressing ‘S’ at the same time – this sends a save command and will save your work to the last requested save location.

Microsoft Office packages have an autosave feature which saves information into a system location on a user adjustable time scale – the default is set to 10 minute intervals. This can be adjusted by opening the ‘Options’ sub menu from the ‘File’ menu ribbon. Select ‘Options’ -> ‘Save’ and then adjust the ‘Save auto-recover information every..[x]..minutes’ and you can adjust to a desired time. By decreasing the time to 5 minutes, you can ensure that your work information is ‘backed up’ on a more regular basis. Using the example of Word, if it crashed for some reason and then restarted, the auto-recover would pop-up on reload and show you the auto saved file. Through Microsoft integration, the latest Office suite has almost identical options and is similar with older versions of Microsoft Office.To find these options in Office 2003 suite, navigate to tools and then options.

There are other options available, such as auto save recovery file location which can also be modified.

Home recovery using Recuva from Piriform Technologies

If you delete a file off a memory stick or drive at home then you may be able to get it back by using a piece of software called Recuva from Piriform. Recuva is extremely easy to use and is wizard driven so you can easily customise your search and retrieval options. Once you have completed your search, you will be presented with a screen similar to the one shown below. Here you can view deleted files and right click on the files to recover them and view other options.

Click here to go to Piriform’s download page.

  Read More